


 Sale
Sale


Your Cart is Empty
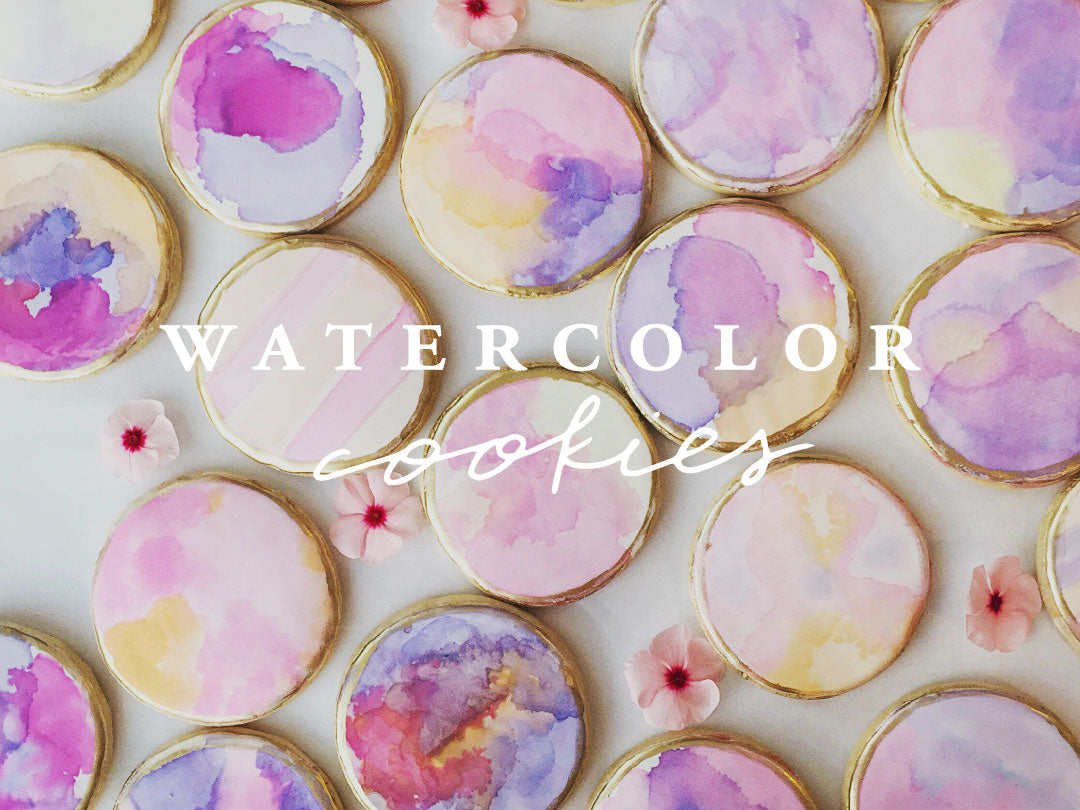

Our new pastel lifestyleand fitness collections have us feeling inspired in the sweetest way! In honor of this fun launch, we teamed up with Jennifer of Sweet Marie's to teach us how to watercolor paint cookies. Yes, that's a thing! Jennifer's creative eye takes our purple and pink hues and brings them to life in an innovative and edible way. ;) Can you think of anything better than meshing food and art?? Try this step by step watercolor tutorial and see what kind of Muse textures you come up with. Follow @sweetmariesdessertstudio for more watercolor ideas and so much more!

Iced Cookies-Fondant or Royal Icing
Toothpicks
Clear Extract- Vanilla, Almond or your favorite flavor
Gel Food Coloring
Plastic Painting Pallet from the craft store or a small cup for mixing paint colors
Assorted Pastry Brushes or unused craft brushes
Paper Towels or Parchment Paper


1. Let's Start! Ensure the icing on your cookie is completely dry and place it on your paper towel or parchment paper as it can get a little messy.
2. Mixing your Paint. Place a small amount of extract into the well of the paint pallet, I start with a capful of extract. (Note: you may be tempted to use water instead of extract but water will make your cookie soggy. Extract contains alcohol which evaporates quickly and will not harm the surface of your cookie.)
Food coloring is very concentrated, you only need a small amount to achieve the perfect color. Dip the tip of a toothpick into the food coloring and swirl the toothpick into the measured extract. Mix until you achieve your desired color. If you find the color you made is a bit dark, just add more extract to lighten.
3. Making your Masterpiece! Use your brush to paint like you would on any surface. Try painting flowers, landscapes or anything your heart desires.

To achieve my signature watercolor look saturate the tip of the brush with the darkest color and then tap the tip of the brush gently onto the cookie. The color will flow from the brush onto the cookie and create little puddles. I like to let the puddles dry before adding my next color. Continue this process to layer the colors and achieve your own signature look.
Have fun creating your own signature masterpiece!

Photo credit: Flat 18 Photography
 |
 |
Comments will be approved before showing up.
 One Piece
 Swim Bottoms
 Men's Swim
 Kids Swim
 New Arrivals
 Cover-Ups
 Maternity Swim
 Pants + Skirts
 Jumpsuits + Rompers
 Dresses
 Loungewear
 Men's
Men's Best Sellers
 NCAA
NCAA Kindle Cases
 Skincare
 Hats
Hats Hair Accessories
 Jewelry
 Swim Accessories


Vickey
November 12, 2025
If you put a black line around your design, do you use an edible marker and do you do your lines first or after watercolor dries?